
Start a chat
1
Open a new chat
Click AI Studio in the console sidebar, then New Chat in the AI Studio sidebar.
2
Choose the scope
The project selector above the composer reads Whole workspace. Leave it, or pick a project to lock the chat to that project. See Project chats.
3
Choose the mode
A new chat starts in Ask mode. Click Agent to switch to Agent mode when the task needs tools run on a worker. The button turns orange and the console confirms with “Agent mode enabled”.
4
Pick a worker (Agent mode)
In Agent mode a worker selector appears next to the project selector. Leave it on Auto (any worker) or pick a worker.
5
Check the model, reasoning effort and approval mode
The model and reasoning effort sit at the bottom left of the composer, the approval mode next to the send button. The defaults are usually what you want.
6
Send your message
Type your request, or pick a starter prompt below the composer, then press Enter.
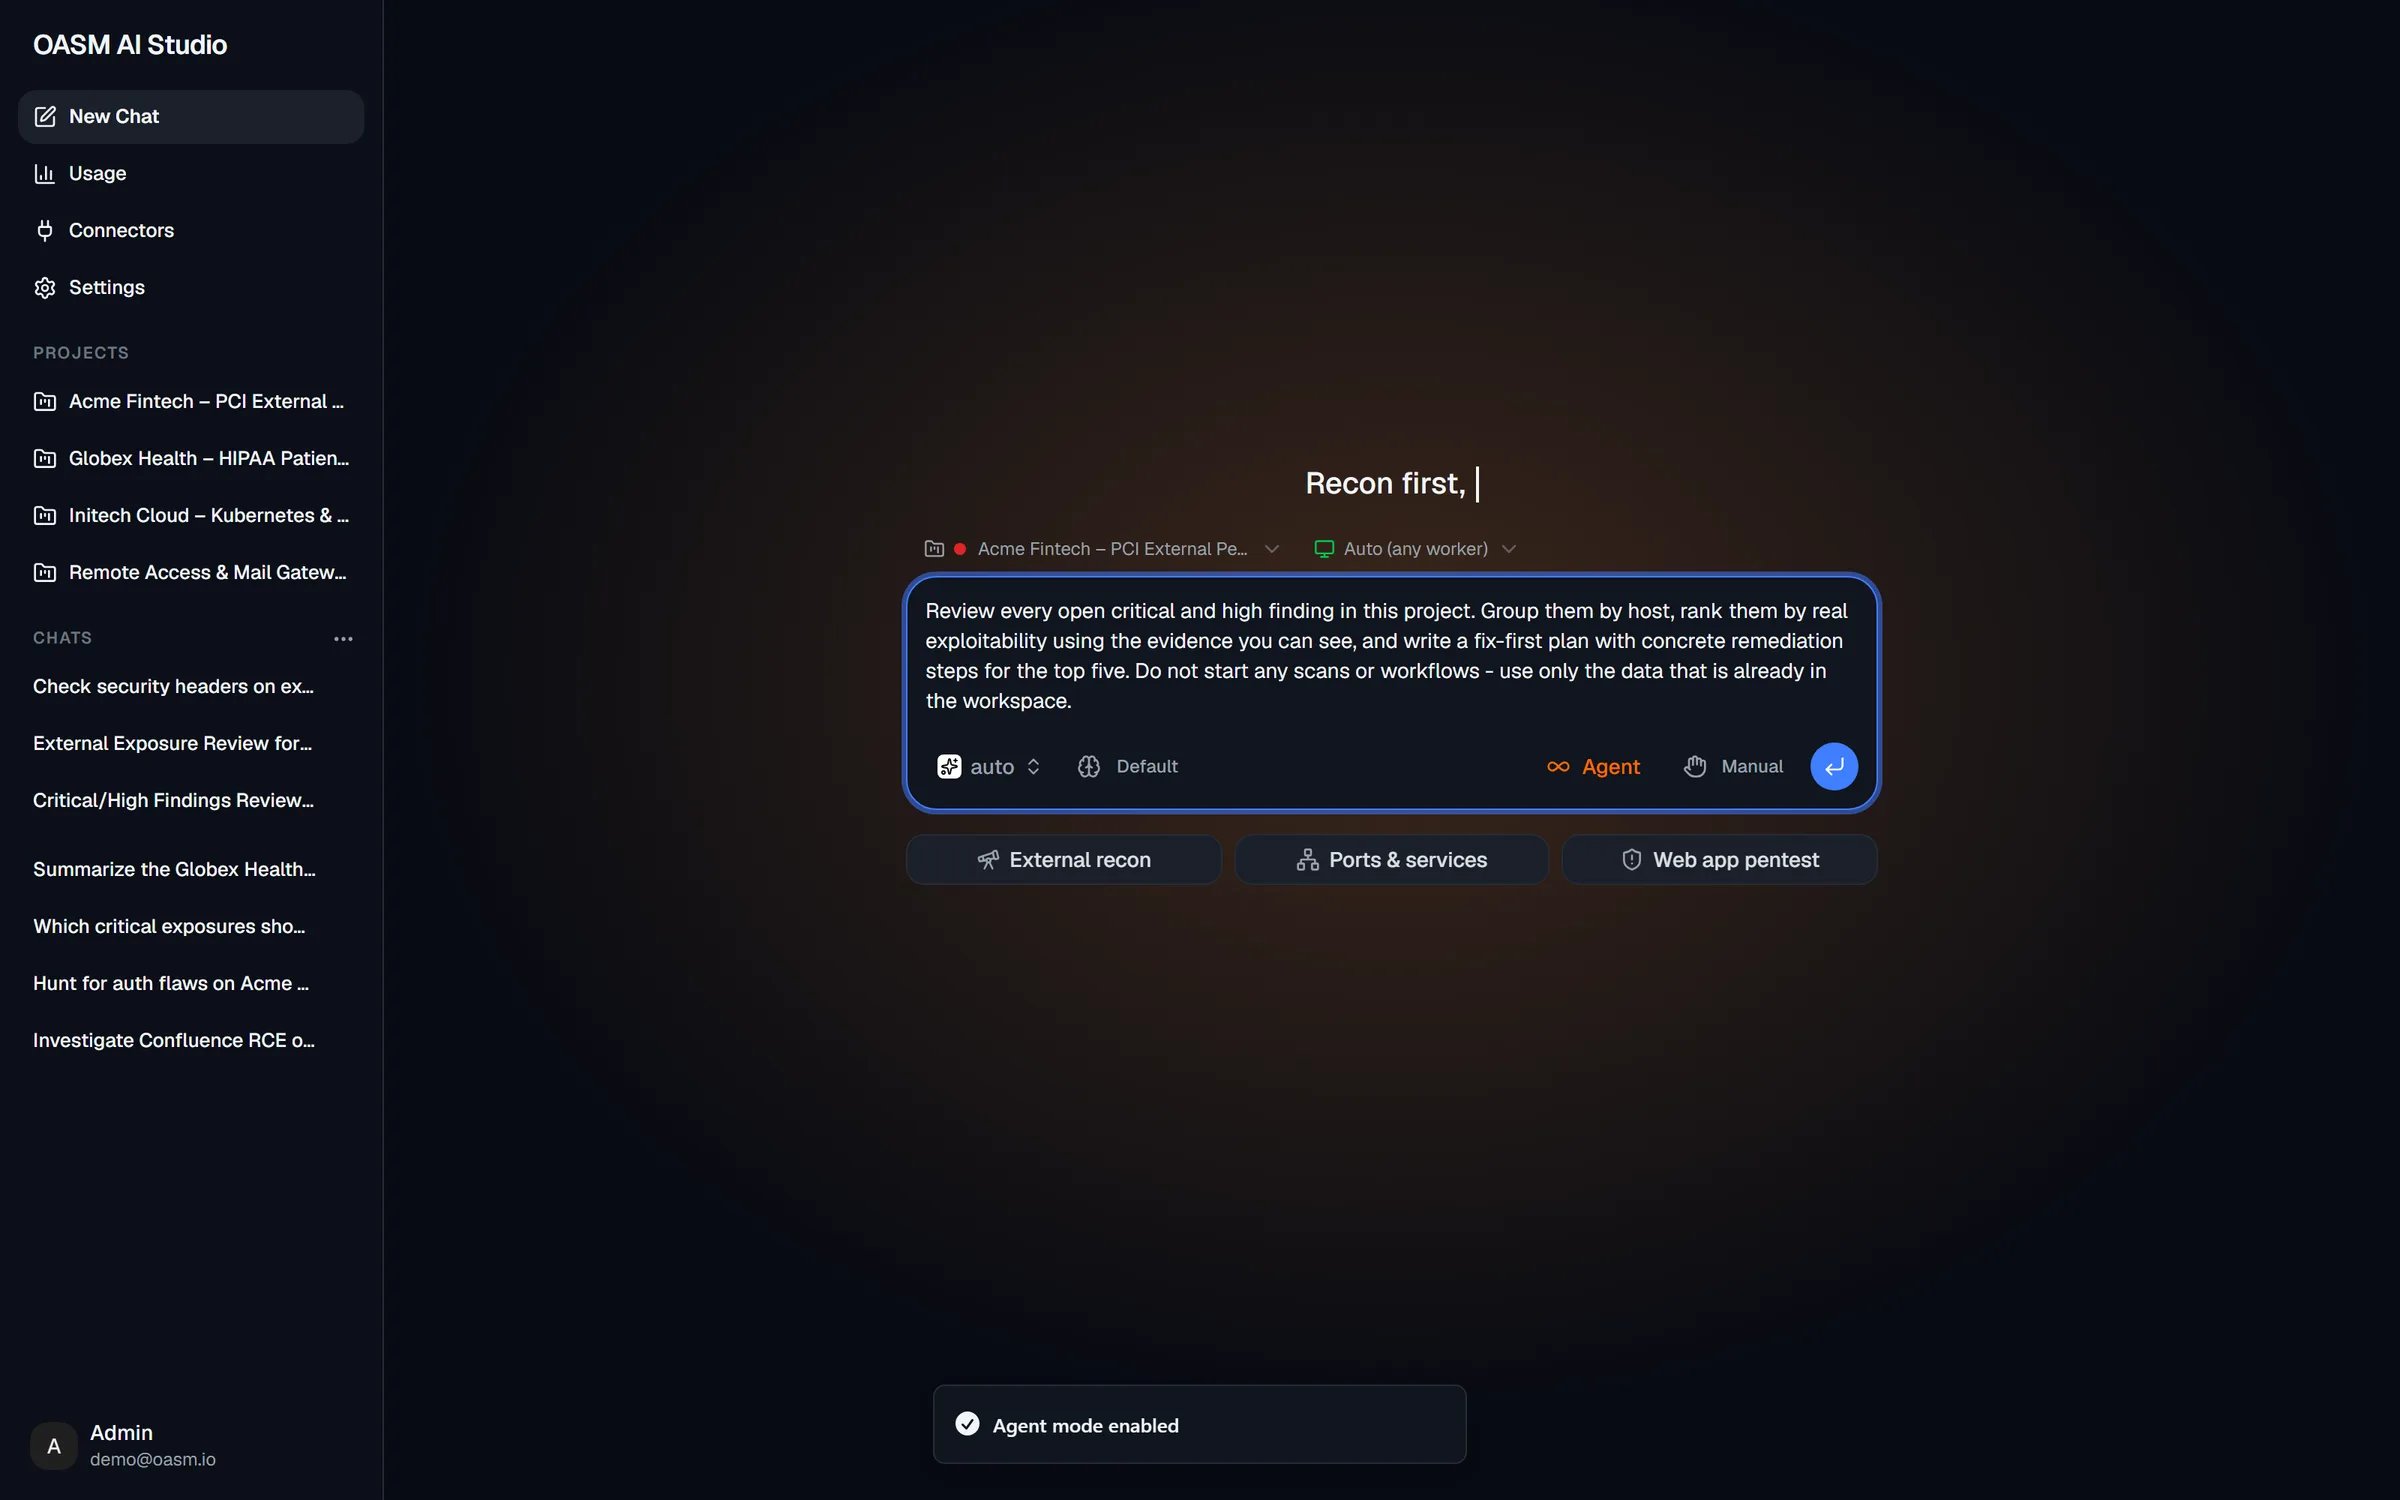
A new chat in Agent mode, scoped to a project, with the starter prompt groups below the composer
The composer
Project
The project selector lists your active projects. A chat about a project only reads and changes that project’s data, and follows the project’s instructions and files. See Project chats.Worker
In Agent mode the agent runs commands on a worker. With Auto (any worker), OASM uses a connected worker of your workspace, or a global one if none is connected, and the chat keeps using the worker it ran on first while that worker stays online.- Pick the worker before you send the first message: the chat keeps the worker it starts with.
- The list only shows workers that are online right now, and refreshes each time you open it.
- If the worker you picked goes offline, the selector switches back to Auto and the console says “The selected worker went offline, switched to Auto”.
- Agent mode needs at least one online worker. With none, the Agent button opens the connect-worker dialog instead of switching mode. If you send an Agent-mode message while no worker is online, the same dialog opens and your message stays in the composer; once the new worker joins, the message is sent on it (or on Auto if the worker is not ready within 10 seconds).
Model and reasoning effort
The model selector shows the model of the connection the chat uses: your default connection in a new chat. Picking a model also saves it as that connection’s model, and the console confirms with “Model updated”. With no connection at all, the selector reads Connect LLM and opens the provider settings. The reasoning effort selector starts at Default: your settings default, else the provider’s. It lists the levels the model publishes, from None, Minimal, Low, Medium, High, Extra high and Max; a model that publishes none gets Low, Medium and High. The effort you pick is saved on the connection, next to its model. You can change the model and the effort between messages of the same chat. To change the defaults, see Models.Approval mode
The approval selector shows the current mode; its tooltip reads “Approval: Manual” or “Approval: Auto”.
A new chat starts in your Default Approval Mode from Models. Without one, it starts in the mode you last picked in this browser, or Manual the first time. See Plans and approvals for what each mode asks and the checks that run in both.
Send and stop
Press Enter or click the send button. Shift+Enter adds a new line. The send button stays disabled while the box is empty. While the agent works, the text box is disabled and reads “Waiting for response…”, and the send button turns into Stop. See Stop a run.Ask mode and Agent mode
Ask mode
Ask mode answers questions about your workspace. The agent looks up what it needs, such as assets, targets, vulnerabilities, issues, ports, technologies, TLS certificates, statistics, workers, jobs, installed tools and projects, and answers from what it finds. For general security questions it answers from its own knowledge, and fetches a public page such as a CVE record when it needs current facts. Ask mode cannot run commands, scans or tools. When you ask for that, the agent says the task needs Agent mode and still answers whatever it can from workspace data.Fetching a web page is not treated as read-only, so in Manual approval mode the agent asks before it fetches one, even in Ask mode. Workspace lookups never ask.
Agent mode
Agent mode does everything Ask mode does, and can also act:- Run commands and installed tool connectors on the chat’s worker, and drive a headless browser there.
- Create and change projects, add targets, install tools and run project workflows.
- Record a finding it confirmed as a proposal for review (see Findings the agent proposes).
- Hand focused jobs to subagents that run in the background, several at once (see Side panel).
Starter prompts
Below the composer of a new chat, three topic chips offer ready-made prompts. Click a chip to list its prompts; hover over one (or focus it with the keyboard) to preview it as the composer’s placeholder. Click ×, press Esc or click outside the list to go back to the chips.
Each group holds five prompts. Some examples:
- Ask mode
- Agent mode
- Overview: “Summarize the security posture of this workspace”, “What are the top 5 risks I should fix this week?”
- Attack surface: “Which open ports are most common, and which ones look risky?”, “Find assets that expose admin panels or login pages”
- Vulnerabilities: “Show my critical and high vulnerabilities and how to fix them”, “Which vulnerabilities have a known CVE?”
Example: run an agent task
This walk-through scans one host for exposed services, approving each command as it comes.1
Start an Agent-mode chat
Click New Chat, pick the project the host belongs to in the project selector, and click Agent. Leave the worker on Auto (any worker) and the approval mode on Manual.
2
Pick a prompt and add the target
Click Ports & services, then “Scan my public host for open ports, then fingerprint the services on what is open and report what is unexpectedly exposed to the internet”. Type the host after the prompt, for example
app.example.com, and press Enter.3
Review the plan
The goal appears first, then the agent’s plan. The Run this plan? prompt takes the place of the composer. Read the steps, then choose Yes, but approve each command (press 2). To change the plan, type what to change in Tell the agent how to change the plan and press Enter; the agent sends a revised plan.
4
Approve the commands
As the agent works, each new command shows Run this command? with the exact command line. Press 1 (Yes) to run it, or type what to do instead and press Enter.
5
Follow the run
Tool calls appear in the chat as they run. Click Open side panel at the top right to watch the plan’s progress, the subagents the agent dispatched and every tool call. See Side panel.
6
Read the answer
The final answer opens with whether the goal was met (fully, partly or not), then the findings with their evidence and the next steps worth doing. Findings the agent confirmed may also wait for you under Vulnerabilities → Pending review (AI).
7
Follow up
Ask a follow-up in the same chat, for example “Check the TLS configuration of the services you found”. New work that needs tools gets a new plan to approve.
Answers
The answer streams into the conversation:- Thinking: while the model reasons, a Thinking label shows; once done it reads, for example, “Thought for 4 seconds”. Expand it to read the reasoning.
- Tool calls appear inline as they run. Two or more calls in a row fold into one group labeled with the latest call and a count, such as Transition Step with a 46 tool calls badge; expand it to see each call. A remote command shows its output live.
- The plan shows in its own card with its steps and a status: Planning while it waits for your approval, Plan ready once approved.
- Copy: under a finished answer, the copy button copies its text. Older answers show it when you hover over them.
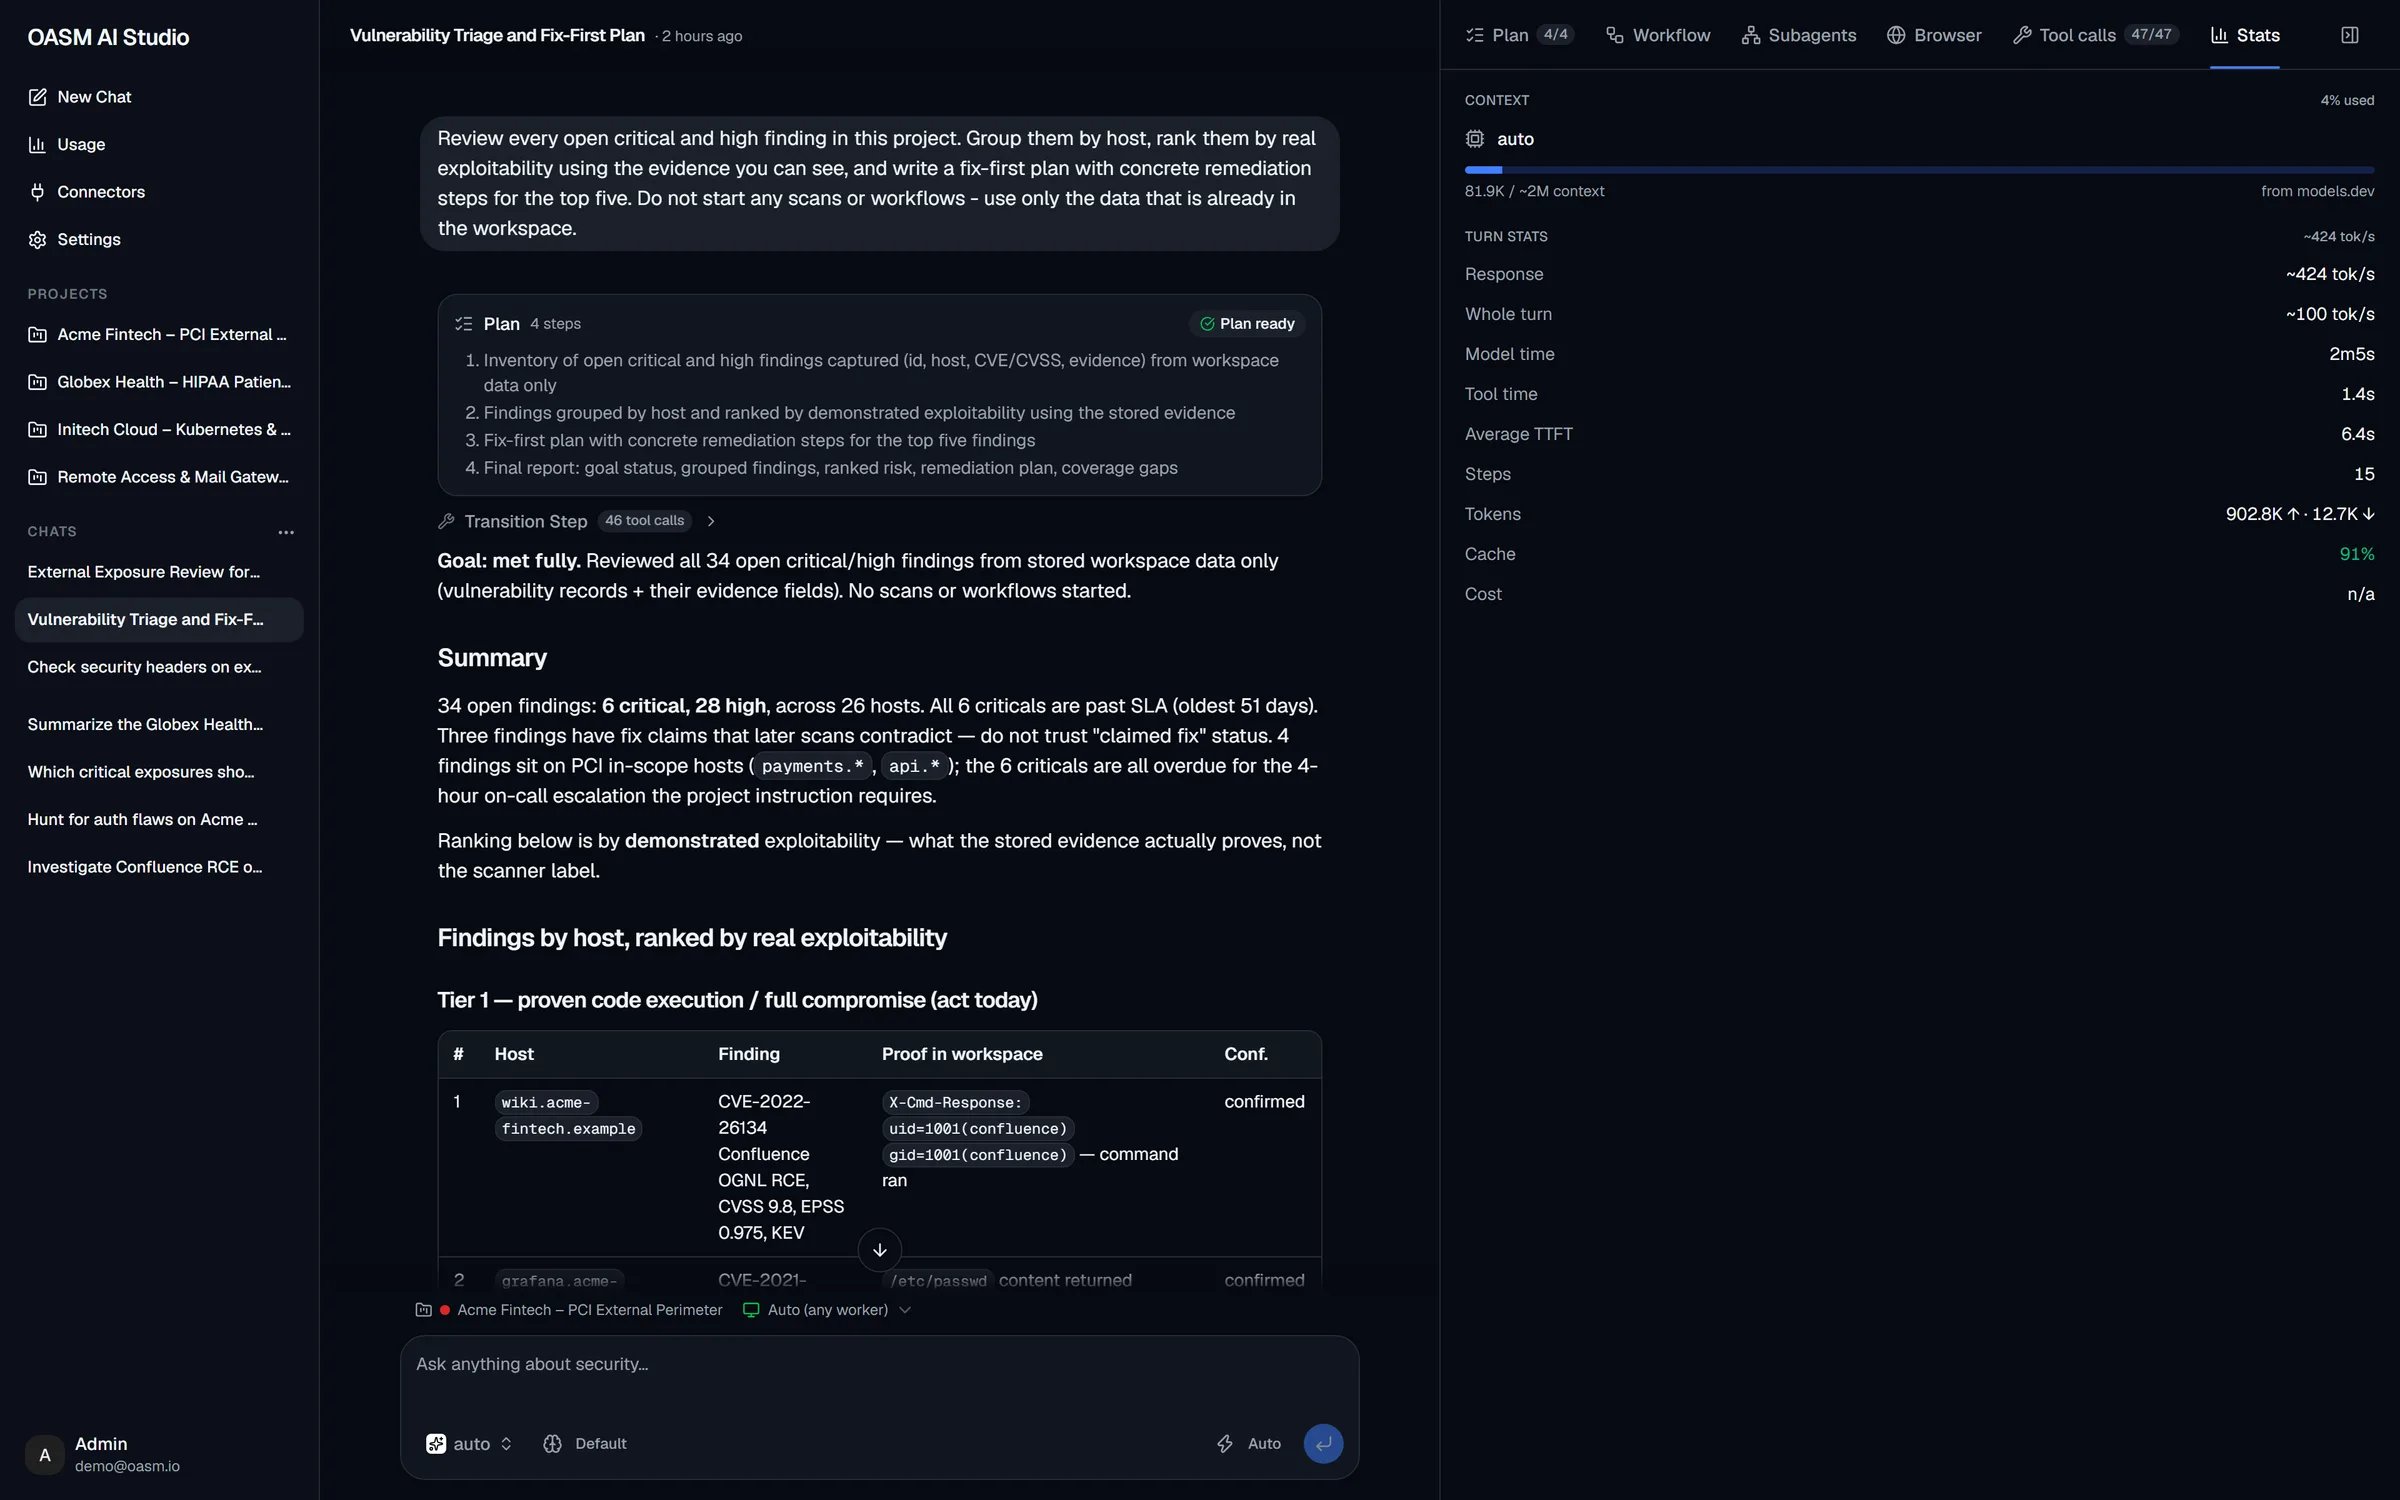
A finished Agent-mode answer, with the approved plan and grouped tool calls above it
Follow-ups
When an answer is finished, send your next message in the same chat. The agent keeps the conversation’s history, project, mode and worker.- You can change the model, the reasoning effort and the approval mode between messages.
- In Agent mode, once every step of a plan is done, new work that needs tools starts with a new plan for you to approve.
- Long conversations are summarized automatically so they keep fitting in the model’s context window. The Stats tab of the side panel shows how much of it is used.
Runs keep going on the server
A run belongs to the server, not to your browser tab. If you close the tab, reload, open another conversation or lose your connection, the run keeps going. Open the conversation again to pick up the live answer, or read the result once it has finished. A spinner next to a chat in the Chats list shows it is still running. An approval prompt waits for you too: open the conversation again within five minutes and it is shown again. After five minutes it counts as rejected.Stop a run
Click Stop in the composer. Stopping:- ends the run on the server,
- cancels the conversation’s queued and running subagents,
- puts the plan step that was running back to pending, so your next message can pick the plan up again.
agent.write permission.
Conversations
The Chats list in the AI Studio sidebar shows your conversations, the most recently active first. Click one to open it, and Load more at the bottom for older ones.Titles
A new chat is titled with your first message. After the first answer, OASM replaces it with a short title generated from the question and the answer. A chat you renamed keeps your title. Until a title exists, the chat reads New conversation. The chat’s header shows its title and how long ago it started.Rename or delete a chat
1
Open the chat's menu
Hover over the chat in the Chats list and click … (Conversation actions).
2
Rename or delete
- Rename turns the title into a text box. Press Enter or click away to save, Esc to cancel.
- Delete asks you to confirm. Deleting the open chat takes you to a new chat.
agent.write permission.
Deleting a project also deletes its chats.
Keyboard shortcuts
Open AI Studio from elsewhere in the console
Run AI Pentest, AI gen and Chat with agent are only shown to members with the
agent.read permission.
The Analyze button on a vulnerability’s AI Analysis tab is not an AI Studio chat: it writes a report on the finding with your connected model, right on the vulnerability page. See AI analysis.
Findings the agent proposes
In Agent mode, the agent can record a finding it confirmed with evidence: the requests that reproduce it, the responses that prove it and a baseline to compare against. The finding does not appear among your vulnerabilities right away. It becomes a proposal under Vulnerabilities → Pending review (AI), where a reviewer approves, rejects or merges it. The review page links back to the chat with Open conversation. The agent can only propose findings when you have thevulnerability.write permission. See AI proposals and review.
Permissions
What the agent may do with your workspace data follows your own permissions: a tool that needs a permission you lack is refused before anything runs. See Permissions.
Related
Plans and approvals
Approve plans and commands, and the checks that run in Auto mode too
Side panel
Follow the plan, subagents, browser and tool calls of a run
Project chats
Lock a chat to a project and give the agent instructions and files
Models
Default model, reasoning effort and approval mode